Photography
Time Shift Projects
Building an Intervalometer
An intervalometer, as used in photography, is a device that signals a camera shutter to be operated at specific intervals. The camera involved is, usually, a motion picture camera of some type, although a traditional camera with a motor drive for advancing the film could also be used.
The result is a series of images that record a scene over a period of time and when these images are viewed sequentially, we get a sped up view of the scene, compressing time from, say, 1 hour to 10 seconds.
I played around with some stop-motion animation using an 8mm camera that had a single frame release shutter and was intrigued to try compressing time using an intervalometer. The prodding to do so came in 1986 when the houses in my neighborhood of Long Beach, California became valuable solely for their lot value. Due to a rezoning action, lots were targeted for multi-unit apartment buildings. While I was dismayed at the idea of becoming an "in fill lot," it prompted me into action to take some time lapse film of the work being done. (Part of that prodding into action also pushed me into a career change and a move to Montana.)
 I inherited a very nice Elmo Super-8mm sound-on-film system that included a projector, editor, camera, and a complete set of accessories from a relation who had moved on to video. The camera, a 1012S-XL had a "remote" port that accepted a cable that could be used to start and stop the camera. The camera also had a frame speed selector that included 1, 18, and 24 frames per second. Using the "1" setting, and the remote, I found that I could release one frame per press of the remote button.
It was easy enough to build my own "remote button" using the same type of pin connector wired to a paddle-type micro-switch in the normally open position. When the paddle was pressed, the camera took one frame of film. All I needed was a method to operate the switch. While I had some background in electronics I am more of a mechanic than a circuit designer and so I approached the problem from that position. I first bought a clock movement, one for a grandfather clock as it wad the largest motor I could find. With that movement I also bought a flange that attaches to the axle (is that the name?) for the minute hand since I wanted something that rotated once per hour.
 To the flange I attached a disk cut out of a piece of plywood. Around the edge of the plywood disc, on its "face," I place 15 wood screws at 24 degrees apart. I scabbed together an assembly to which I could mount the switch so that as the screws passed it, they would press the paddle. After a bit of adjusting and testing it was ready to go. (More and larger photos below.)
I went up into the attic space of my house and removed one of the wooden slats in the vent that looked to the south. I ran an extension cord up there, placed the camera on a tripod, plugged it's AC adapter into the extension cord, aimed and focused. I placed the intervalometer nearby, plugged the micro-switch into the camera's remote port, and plugged the clock movement into a 24-hour timer that was set to turn on about the time the work crews would arrive and turn off at the end of the day.
Since a Super 8 film cartridge, at 18 fps, would yield a 3 minute, 20 second run time, that's 200 seconds X 18 fps, or 3600 frames. If the intervalometer releases 15 frames per hour at, say, 11 hours per day, that's 165 frames per day, it should film for 21 days. After 3 weeks I retrieved the film and had it developed. It looked pretty good so, I placed a new film cartridge in the camera and let it film some more. Over the next few months I also filmed the construction on the north side of the house and finally to the west behind the house.
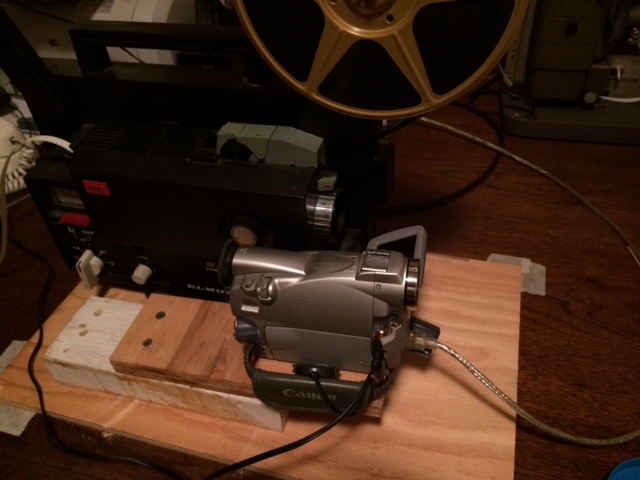 To capture to digital, I used the Elmo projector (new belts installed) to display the image on a piece of white paper. Next to the projector, I placed a Canon ZR40 video camera, with the shutter speed set to 1/60, and sent the live image to my computer over a firewire cable. The Elmo projector has a motor speed control board with an adjustable potentiometer. I used this to adjust the frame rate up slightly to eliminate the usual flicker one gets when transferring film to video. I used Adobe Premiere in Windows to do the capture as my Mac and the camera have an issue working together. The resultant file was moved to my Mac where I used Handbrake and Miro to output the mp4, ogg, and webm files for this page.
Here are the results.
If you are using Chrome, you might not be able to play the video in the embedded player but you can download the video files here:
.mp4 (50 MB)
.ogv (25 MB) (Click on this and it should play in Chrome)
.webm (95 MB) (Click on this and it should play in Chrome)
Click on the images below to enlarge them.
 | This is the intervalometer with the 24-hour timer used to turn it on and off. |
| This is the intervalometer from a top view. |
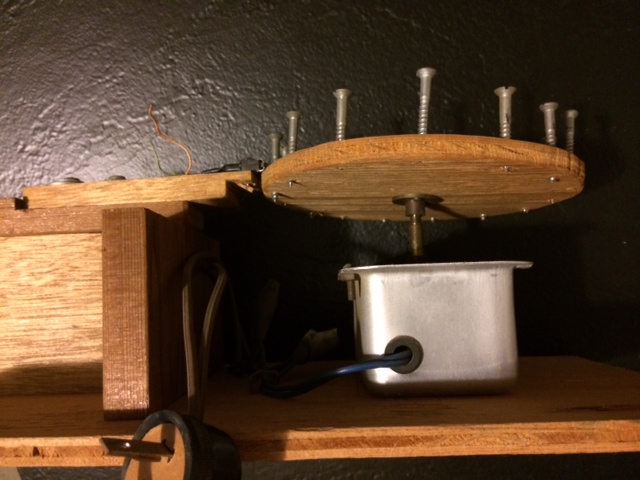 | Looking under the disk to see how the disk is attached to the clock movement. Notice that the disk is screwed to the flange and the flange is attached to the clock movement's hour hand. |
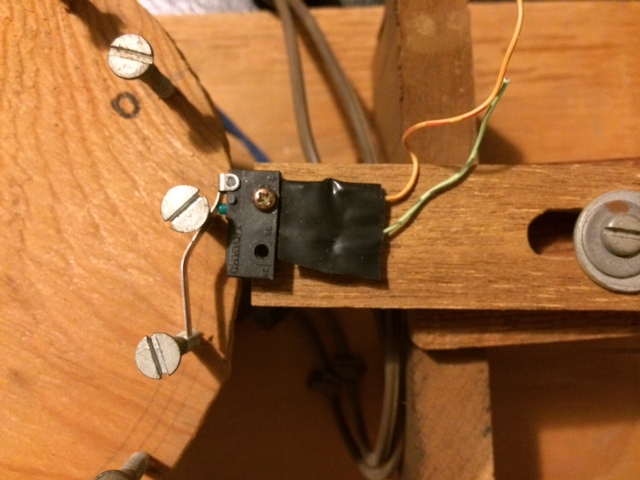 | A close-up of the micro-switch. |
| The camera used in the project. |
| Capturing the Super 8mm to digital. |